![]()
![]()
![]()
![]()
 The
Lamson-Aerocurve
The
Lamson-Aerocurve
(get the german version ![]() )
)
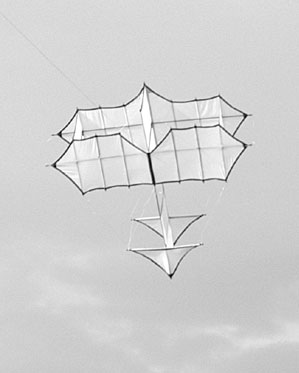
If you want to see some detail pictures - take a look here.
Here you can find some pictures of Aerocurves builded with the aid of my plan. (only german subtitels)
![]()
Material List:
• 2,5m ripstop nylon or parachute silk (140 cm width)
• 15m hem strip made of ripstop nylon
• 1,5m Dacron (5cm width) (possibly 3,6m for the spine pockets)
• 12x 50cm approx carbon fibre pipe 6mm diameter (batten)
• 2x 58 cm approx carbon fibre pipe 6 mm diameter (cross spar back wing)
• 4x 45 cm approx carbon fibre pipe 6 mm diameter (vertical center)
• 4x 150 cm carbon fibre pipe 6 mm diameter (spine and cross spar front
wing)
• 4x eyelets to drive into
• 5x split caps 6mm
• 0.3 m 6mm id poly tube
• 2.5m 6mm material for loops
• 16m 30kp line
• 2x line adjuster
 The Plan:
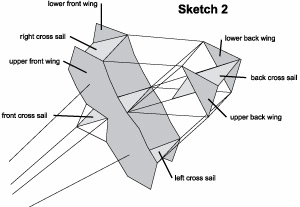
To avoid misunderstandings, all parts of the sail are labelled (sketch 2)
To produce the patterns you have two possibilities: either you draw the patterns
according to the sketch (sketch
1) or you download the patterns 1:1,
print them, stick them edge to edge and cut them out.
All sail patterns will be hemmed so there is no need to hot-cut them. If you want to work without a ripstop nylon hem strip and only with a single hem you have to consider an addition for the hem and hot-cut the parts.
To economize paper, all parts of the cross sail are drawn in one pattern, because they distinguish only in total of length and arrangement of gaps. So it is possible to cut out the front cross sail (1x), shorten the pattern, cut out the lateral cross sail (2x), shorten the pattern again and cut out the back cross sail. The gaps should be cut out later!
It’s the same with the front wings. At first
cut twice out the upper half of the wing, shorten the pattern at the
broken line and then cut out twice the lower half of the wing. If you
want to, you can produce the wings in one part – it saves one
seam but uses more material.
Additionally you need eight strips (45x4 cm) for the spine pockets
on the front wings.
Sewing:
Before hemming all parts, reinforcements made of Dacron need to be
sewed onto the outer tips (left/right) of the front wing and the back
tip of the back wing. Later on, loops will be sewed on or eyelets driven
into, which are not allowed to tear out.
Now, all parts have to be hemmed at the following
edges: the four cross sails at both rounded sides – not at the
straight sides!!! The two back wings are hemmed at all three sides,
the front wings are hemmed nearly completely with the exception of
the seam with which both halves of the wing will be sewed together.
If the spine pockets are made of ripstop nylon, they also need to be
hemmed at the short sides (4cm).
Before all parts are sewed together, reinforcements made of Dacron
for the spar passage need to be sewed onto the cross sails. You need
eight Dacron pieces of 7.7cm length each. On one side they need to
be rounded so they do not fray. Then they are sewed onto the cross
sails as shown in the pattern. A little explanation about this: all
cross sails are drawn in one pattern, so you must be careful, which
gap belongs to which cross sail (straight line – front cross
sail; broken line – back cross sail; dotted line – left/right
cross sail).
At last, hot-cut the gaps in the cross sails. It will suffice to sew the reinforcements at one side, because reinforcements at both sides could become too thick when closing the spine pockets – but more about this later on.
Now follows the sewing:
to make it
easier it the Lamson is divided into two parts (the order of sewing
does not matter): the front part consists of two side cross sails,
one front cross sail and the two front wings; the back part consists
of the back cross sail and both back wings.
Let’s start with the easier part, the back part:
At both back wings the straight lower edge is folded down about 20mm
and is sewed onto the sail prancing a straight seam 12mm from the fold.
Now, it’s getting tricky:
Draw a center line on one wing from the tip to the lower edge. On the
lower cross sail you have to draw a line along the middle of the
future spine pocket 20mm from the outride edge. Now the marked
wing is sewed on the cross sail line on line, the finished spine
pocket upward. Make the tip of the wing flush with the cross sail’s
back trailing edge. Do not close the spine pocket with this seam!
Who thought, that was tricky will be surprised: now the spine pockets
come into being…
For this purpose the back cross sail is folded 8mm at the side you
just worked on, and again 12mm. This could become a little bit difficult,
because the wing is already sewed on the back part. To close the spine
pocket, sew it onto the cross sail as close as possible along the just
developed first fold. This double folding makes the edge of cut of
the sail disappear in the spine pocket.
The same procedure is applied to the other back wing at the same cross sail.
Now the more difficult front part:
 At
first, sew the inner spine pockets on each half of the wing – on
the lower side of the lower wing and on the upper side of the upper
wing. To get non-fraying borders you fold the thin strips about 8mm
on both long edges and sew them onto the wing. On the lower wing’s
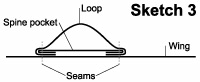
lower side a bridle point is attached to the outer spine pocket.
For this purpose, a loop of 6cm length made of thin webbing or triple
folded hem strip needs to be sewed on together with the spine pocket – 18cm
from the front wing’s edge (see sketch 3).
At
first, sew the inner spine pockets on each half of the wing – on
the lower side of the lower wing and on the upper side of the upper
wing. To get non-fraying borders you fold the thin strips about 8mm
on both long edges and sew them onto the wing. On the lower wing’s
lower side a bridle point is attached to the outer spine pocket.
For this purpose, a loop of 6cm length made of thin webbing or triple
folded hem strip needs to be sewed on together with the spine pocket – 18cm
from the front wing’s edge (see sketch 3).
If you have used two parts to manufacture the wing,
you have to connect these parts now with a fell seam.
Now the step you did at the back part which has to be carried out three
times: draw a line on the wing, seam on the corresponding cross sail
and close the spine pocket. Take care, in the middle and make the wing’s
back edge flush with the cross sail’s back edge.
Loops of thin webbing or triple hem strip are sewed
on all corners of the sail with the exception of the outer tips of
the front wings. These loops should project out about 3 cm beyond the
sail’s border. There are 14 loops in total at each front wing;
3 at each back wing and one on the upper and one on the lower edge
of the back cross sail.
Finally the eyelets have to be wrapped in into the four outer tips
of the front wing - about 1 cm away from the borders.
Framing:
Before framing you have to produce connectors made of poly tube. Cut
to size 8 poly tube pieces 3,5 cm length each. Drill a hole into
each piece (6mm diameter) 4mm away from the lower edge. Thus You
already finished two connectors for the back part. Drill another
hole (6mm diameter) into each of the six remaining pieces in a right
angle 2mm over the first hole.
The framing is a little bit difficult because each of the 12 front
wing battens has to be adapted because of possible inaccurateness of
sewing. A flat screwdriver is helpful when tighting the loops on the
spars` ends. Cover all loops with a 1 cm piece of poly tube so they
are secured from slipping away. You can also do this with split caps,
but this is more expensive.
Do the same with the back wing’s cross spars.
When you install the outer battens put them into a connector’s
lower hole and then move the connector to the gap.
Now shorten the two spines to a length of 145cm and put them into the
middle spine pockets of the front part. Secure the upper spine with
a poly tube at the front. The lower spine has to be secured with a
split cap, because an adjustment line has to be put in later on. Now
stretch the back part of the Lamson onto both spines and secure the
loops with poly tube. Do not forget the last four connectors while
putting in the spines!
Tie an 50cm piece of line to the upper wing’s front part middle loop (at the spine). After putting on the line adjuster, pull the line through the upper loop at the Lamson’s back part and back again to the line adjuster, tie it. Do the same with the second line adjuster at the lower spine. Now you can put the Lamson under tension lengthwise.
Shorten both spars to a length of 150cm, push them through the upper holes of the respective three connectors and put a split cap on it. Now you can put the Lamson under diagonal tautness. To do so, make loops from four pieces of line, of 30cm length each. To stretch it, put the loop through the sail’s tip’s eyelet and then in the split cap. When you pull the end of one loop to the split cap you can tighten the sail. When the right tautness is reached shorten the loop with a knot and put it into the split cap. The advantage of this: should the sail’s material have stretched, you can move the knot in the loop and ighten the sail again.
Now the Lamson is almost finished – only a little
bit flat. So the last four vertical centers have to be put in. The
length of the spars depends on the connectors and the accurateness
of sewing. Theoretically they should be 44.6cm long – but you
better measure.
The first time it’s a little difficult to put the spars in, but
after the first flight it’s getting easier. And now the Lamson
Aerocurve is almost assembled.
Wiring:
That the Lamson in order to avoid pulls out of shape, a wiring is needed.
But the ones I use are simpler than those Charles Lamson originally
used.
At first provide a 70cm piece of line with loops at both ends and tie
it with a girth hitch behind the poly tube left and right from the
lower front tip. When you now put this line through the lower spine’s
split cap it should be under tension. If it’s not under tension
you have to shorten or lenghten the loops.
To avoid the sloping of both back wings during flight, you need two
lines, 48,5 cm each, including loops at each end. This number might
change because of inaccurateness of sewing. These two lines are hung
to both sides of the wing - upside and downside to the poly tube ring
at the end of the cross spar - now both wings should be parallel.
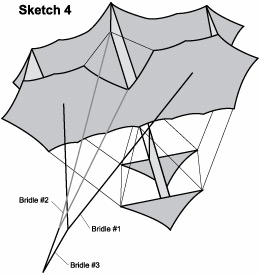 You
have to find out the length of the last four lines. They run from the
middle back loop of the front part through a loop at the outer wing's
tip to the back end of the aoter battern of the front wing. (sketch
4) That's difficult? Right, but also logical when you have a look at
the Lamson. With these lines the front part is tight to the back part,
they form a whole. When you fasten these lines with a line adjuster
you can adjust them with the wind.
You
have to find out the length of the last four lines. They run from the
middle back loop of the front part through a loop at the outer wing's
tip to the back end of the aoter battern of the front wing. (sketch
4) That's difficult? Right, but also logical when you have a look at
the Lamson. With these lines the front part is tight to the back part,
they form a whole. When you fasten these lines with a line adjuster
you can adjust them with the wind.
This needs to be done both on the right and left side both up and down
as well as at the top and at the bottom.
The bridle: (sketch 4)
Charles Lamson used two lines – a flight line and a start line – with
which the kite’s angle of incidence can be varied. But I used – because
of my inexperience – a bridle made of three parts, which brings
the Lamson into the air and back to earth without a start line. And
my bridle makes it possible to adjust the kite to nearly every wind-force.
Bridle #1 with a length of 335cm connects the two bridle points (sewed
on with the spine pockets) at the lower wing. Draw a marking in the
middle of this line. Bridle #2 – also with a length of 335cm – runs
from the split cap at the front end of the lower spine to the front
loop of the lower wing.
Bridle #3 with 150cm lenght includes a loop at each side. Tie one end
with a prussik at the marking into bridle #1. The second end is tied
(also with a prussik) into bridle #2 – about 175cm away from
the back bridle point. When you did this, tie with a prussik a 10cm
loop in the middle of bridle #3. Later, the flight line is tied to
this loop.
Using a prussik the bridle can be adjusted and adapted to the wind
easily. If the Lamson moves to one side, bridle line #1 is not fixed
in the middle. If the Lamson needs more or less buoyancy the proportions
of bridle #2’s sides must be changed. Additionally the loop for
the flight line at bridle #3 must be shifted so that bridle #1+2 are
evenly stretched.
And now: have fun with the Lamson Aerocurve and always good flight!
Please do not hesitate to contact me if you have any questions or
ideas. I would also be glad if you’ll send me pictures of your
Lamson. My E-Mail address info at drachenfliegerinnung.de

![]()
![]()
![]()
![]()